Solidity Basics: Deploy To Ropsten Testnet With Remix

I'm a creative problem solver interested in the Web3 space. I love all the innovation and seems like there's always something new to quench my insatiable desire to learn.
I've been a hobbyist developer for the past 5 years dabbling in Unity game development (c#), python, java and javascript. Now super interested in Solidity and looking to pursue a career in Web3.
I started this blog as a means to solidify my own learning, as well as hopefully help some others out on the same path as me
Introduction
If you've written a Solidity smart contract and tested it locally, the next logical step before deploying to mainnet is to try it out on a test network. Since gas fees on mainnet can be quite high, you want to make sure everything is working as intended and optimized in an environment that simulates the real thing before spending your hard earned ETH.
In my previous article , we wrote 2 smart contracts and used an interface to test out some interaction between them. In this article, we are going to deploy both of those contracts to the Ropsten testnet and verify functionality there. Arguably, one of the easiest ways to do this is with Remix IDE. To do this though, we will need a wallet to hold our test ETH and sign the transactions involved.
If you have your own smart contract you wish to deploy to the Ropsten test network, you can still follow along! We won't be testing the contracts from my previous article until towards the end, so everything else may still be applicable for you.
What You Will Learn
- What a test network is
- How to set up a Metamask Wallet
- How to get test Ether from a faucet
- How to deploy a smart contract to the Ropsten testnet using Remix
What You Will Need
- A Metamask wallet - https://metamask.io/
- Some test Ether in that wallet (We'll go over how to get this)
- A smart contract to deploy
Resources
- MetaMask security tips - https://metamask.zendesk.com/hc/en-us/articles/360015489591-Basic-Safety-and-Security-Tips-for-Metamask
- How To Not Get Rekt: Web3 Wallet Safety - https://ryanharris.dev/posts/web3-wallet-strategy/
What Is a Test Network?
If you've been following along with my articles, so far we've only been testing on a devnet. This is a lightweight local instance of the EVM that only exists temporarily. For something that more closely resembles the actual Ethereum Virtual Machine, we'll need to use a testnet.
As mentioned above, a test network is used for trying out smart contracts before deploying them to the Ethereum Mainnet. There are a few different types but all serve the same purpose. Their differences are mainly in how they achieve consensus. Rinkeby, for example, uses the proof of authority consensus algorithm, while Ropsten uses proof of work. If you are looking to simulate an environment that is closest to Ethereum Mainnet, you'll want to go with Ropsten since in it's current version, Mainnet is using proof of work.
To participate on these networks you will still need ETH however. There are a couple of ways to acquire some but the easiest is through a web-based service called a faucet. Some networks, like Ropsten, are also built to allow for mining, so you could acquire test ETH that way. Aside from these options, you could always ask someone to send you some test ETH directly.
It's also important to note that ETH used on a test network holds no real value. Similar to all currencies, the only reason Mainnet Ether is worth anything is because the community assigns value to it. And because test Ether exists on a separate network, you wouldn't be able to bridge it over to buy your CryptoKitties.
Before we can get any of this test Ether though, we will need a wallet to store it in. For this we will use MetaMask.
How To Set Up A MetaMask Wallet
Metamask on your PC is set up as a browser extension. It is a digital crypto wallet and you can use it to store ETH and any ERC20 tokens. Having a wallet like MetaMask installed in your browser allows you to interact with Ethereum dapps.
First thing's first, let's head over to https://metamask.io/download.html. It should automatically detect which browser you are using and show it as a choice for downloading right at the top but in case it doesn't, the supported browsers are listed just below that. Either way, click on the one that best suits your needs (I am using Chrome) and it will direct you to the install page. Hit the install button to add MetaMask as a browser extension.
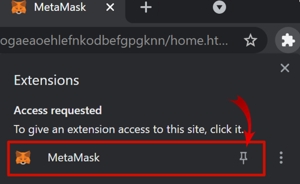
Once MetaMask is installed, a new tab should pop up to get you started. If it doesn't, head into your extensions and click on it directly. You should pin it to your taskbar while you're there for easier access moving forward.
Okay, once you've clicked on the extension, you should be at the "Get Started" page. If you already have a wallet, this is where you would import it. We are going to create a new wallet though, so click that "Create a Wallet" button and let's proceed. I'll leave it up to you whether you want to agree to anonymous usage data collecting or not.
Next you will be asked to make a password for your wallet. I highly suggest using a password manager - bitwarden is a free, open source one and will help you keep track of your passwords and things you are signed up for. Anyway, create a password and let's move on.
If you've never worked with a crypto currency wallet before, I recommend you watch the short video introduced on the next page. It will explain what a secret recovery phrase is and what it is used for. Your personal phrase will be revealed on the following page. NEVER SHARE THIS PHRASE WITH ANYONE. PERIOD. Not even someone at MetaMask. If someone asks you for your secret recovery phrase, they are trying to scam you. Write it down and keep it somewhere safe. See the resources section at the top for additional wallet safety tips.
After you've got your phrase written down somewhere safe, let's proceed to the next page where we are asked to confirm it. Once that's all done, we are finally in our MetaMask wallet!
The first thing we should do is create a new account. I personally like to have a separate account specifically for development stuff, that way I don't send real ETH or accidentally upload the private key for my main account to github. So click on the circle in the top right corner of your screen and let's create a new account. We are going to name this one Dev.

Awesome! You've now set up your MetaMask wallet and are ready to fill it with some test ETH!
How To Get Test ETH
In order to get some test ETH, we are going to use what is called a faucet. Most faucets are just basic web apps where you input the wallet address you would like to receive test ETH to. We will be using the faucet linked directly from the Ethereum official website. There are other faucets out there, just do some research before using them. Some will ask you to connect your wallet and sign a transaction. Just make sure you know what you are signing before you actually do. For safety's sake, I prefer to use faucets that just require an address.
Let's head over to https://faucet.ropsten.be/ and input our wallet address. Click on the MetaMask extension and copy your wallet address.
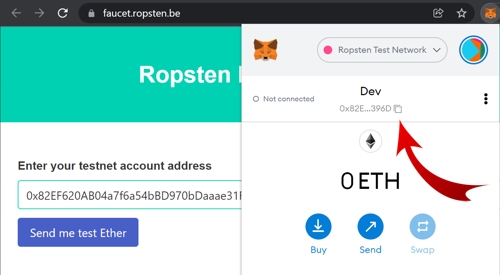
Paste it into the text field and click the "Send me test Ether" button. It may take a little while to get some ETH transferred to your wallet
If you are unable to get any ETH from the faucet mentioned above, I've had pretty good luck with this one: https://faucet.dimensions.network/.
Once we've got some test Eth for the Ropsten network, we are ready to move on.
Accessing Ropsten From Remix
Using the Remix IDE, deploying your smart contracts to a test network is relatively simple. If you've deployed locally with Remix before, the process is much the same.
If you've got your own smart contract you wish to deploy, that's great! If you would like to follow along with the testing we will be doing after deploying, you can use 2 of the smart contracts from my previous articles. The code is posted below. Feel free to deploy them locally and test them out to see how they work.
ChangeState.sol
// SPDX-License-Identifier: UNLICENSED
pragma solidity ^0.8.7;

contract ChangeState {

    string message;

    constructor() {
        message = "Hello World!";
    }

    function setMessage(string memory newMessage) public {
        message = newMessage;
    }

    function getMessage() public view returns (string memory) {
        return message;
    }
}
Interact.sol
// SPDX-License-Identifier: UNLICENSED
pragma solidity ^0.8.7;

interface ChangeState {
    function setMessage(string memory newMessage) external;

    function getMessage() external view returns (string memory);
}

contract Interact {
    function getMessage(address contractAddress) public view returns (string memory) {
        return ChangeState(contractAddress).getMessage();
    }

    function changeMessage(address contractAddress, string memory newMessage) public {
        ChangeState(contractAddress).setMessage(newMessage);
    }
}
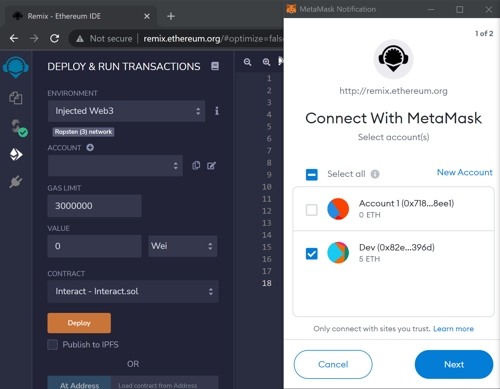
Now that you've got your smart contract ready, head to the Deploy and run transactions tab in Remix. At the very top you'll see the first text field called Environment and it is most likely set on JavaScript VM (London).
Change this setting to Injected Web3 and a MetaMask notification will pop up. It is asking which account you would like to connect to the Remix IDE. Choose your Dev account and press next.
Once you are connected, Remix will automatically detect which network you are on and will display it under the Injected Web3 in the Environment text field. If it doesn't say Ropsten, head into your MetaMask wallet and click on the networks tab. Select Ropsten and now you should be good to go.
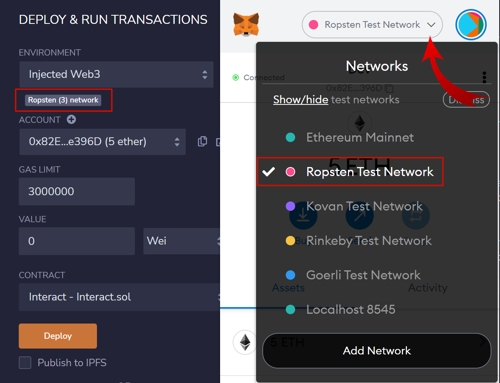
Once you you have the Ropsten Network selected, you should see the amount of test ETH you have in your account as well. It will show in your MetaMask wallet, and also in the Account text field in Remix.
Now, the moment we've all been waiting for! Let's deploy our contracts!
Deploying To The Ropsten Test Network
In the Contract selection field, choose the contract you wish to deploy. If you don't see any options there, make sure you saved your contracts and they compiled without any issues. We will do ChangeState.sol first. Select it under the Contract heading and then hit that Deploy button!
MetaMask will immediately pop up with a transaction you can either confirm or reject. It will display important information such as the gas fee and total cost the transaction will be.
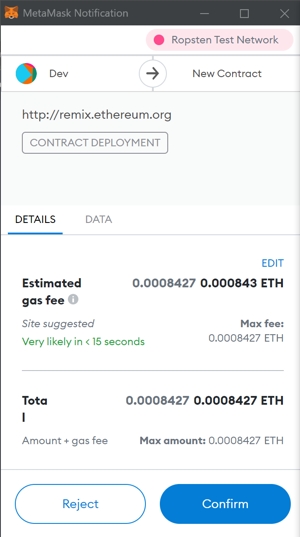
If everything looks good to you, press Confirm. It will take a couple seconds but another pop up, this time from Chrome itself, will appear saying the transaction was confirmed. You can also view the transaction on Etherscan. This is proof that our smart contract is now living on the Ropsten Network!
If you weren't able to follow the link in the popup, you can still view the transaction on Etherscan. Just copy the transaction hash from the transaction receipt printed in the console beneath where you write the code in Remix and paste the value in the URL https://ropsten.etherscan.io/tx/)/YOUR_TRANSACTION_HASH_HERE
So in my case it would be: https://ropsten.etherscan.io/tx/0xd2d08ab6071f0e10ef3c17e092ba47c87b3472bda8e13a0429f6cc8bf4ea3124
Repeat the process for the Interact.sol contract. Again, the transaction will take a little time because it actually needs to be mined and confirmed on the Ropsten Network, just how it would be with Ethereum Mainnet.
You should now see both contracts under the Deployed Contracts section in Remix. That means they are ready to test!
Testing Our Smart Contracts
Nothing really changes in regards to the way we test the functions on our contract now that it is on Ropsten. As such, we will be following the same testing procedures as my last article.
- First, let's check that the contract was initialized with the correct value of the
messagevariable. On theChangeState.solcontract, click thegetMessagebutton and it should return the valueHello World! Next we'll make sure the
Interact.solcontract is retrieving the correct value from ourChangeState.solcontract. Copy the address for theChangeState.solcontract and paste it into thegetMessagefield on theInteract.solcontract. Click thegetMessagebutton and it should also return with a value ofHello World!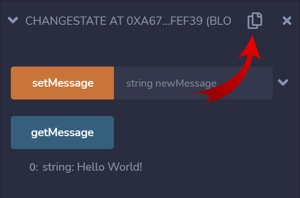
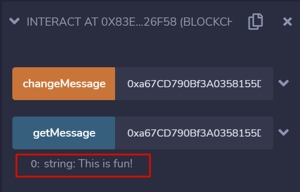
So far so good! Next, we will test out the
changeMessagefunction on theInteract.solcontract. Copy the same address as the previous step into thechangeMessagefield followed by a comma. After the comma, insert whatever message you want to change it to.Once you click the button to operate the function, MetaMask should pop up with another transaction to approve or reject. Once it is approved on the Ropsten Network you will be able to view the transaction on etherscan using the same method as above.
Congratulations! You just utilized the Ropsten test network to change the state of another smart contract! Feels pretty cool, doesn't it? For some extra fun, you can enter the address for the contract I uploaded and interact with that one! Be warned though, I don't have any filters set up and won't be actively monitoring the message so it could be anything, even swear words!!!!
Here's the address for my contract: 0xa67CD790Bf3A0358155DAE55e2232601D57Fef39
Finishing Up
Thank you for taking the time to read my article! I hope it has helped you with getting a MetaMask wallet set up and deploying contracts on a testnet. Also, if you have followed along with this series from the beginning, congrats! You should now have an understanding of some of the important basic concepts of a Solidity smart contract and are now ready to move on to more complicated things.


