No-Code: Buy Me a Coffee With Coinbase!
How I easily installed a Buy Me A Coffee type feature on my website using minimal code.

I'm a creative problem solver interested in the Web3 space. I love all the innovation and seems like there's always something new to quench my insatiable desire to learn.
I've been a hobbyist developer for the past 5 years dabbling in Unity game development (c#), python, java and javascript. Now super interested in Solidity and looking to pursue a career in Web3.
I started this blog as a means to solidify my own learning, as well as hopefully help some others out on the same path as me
Introduction
I never thought of myself as a writer. However, it turns out I actually have a knack for it! Learning new technology and then writing about it helps me solidify the concepts. As an added bonus, I’m able to help teach others on the same path as me. Creating technical content is fun! Eating cheap, frozen dinners every night is not. So how can I start accepting payment for all the hard work I’m putting in?
Some of my readers suggested I build a “Buy Me A Coffee” type feature on my website. This simple method to start accepting crypto donations could be my answer to move from frozen dinners to fresh produce!
This article will explain how I installed a method to receive crypto donations using no-code solutions by Coinbase Commerce. Then, we’ll build a simple project so you can see just how easy it is and how little code is involved.
The Problem: Broke But Still Building
I tell my readers and Twitter followers all the time that creating content around web3 tech is one of the best ways to learn it. Writing about something quickly points out any gaps in your knowledge. It’s a fast track to understanding these complicated networks and how they operate at a technical level. However, what I don’t tell them is that when you’re first starting out, writing technical articles doesn’t exactly pay the bills if you don’t have any clients yet.
Clients or not, helping others learn through content creation is rewarding. One of my favorite aspects of being a technical writer is when a reader reaches out saying that I helped them solve a problem or learn something new. Some of these readers even expressed interest in returning the favor. They suggested I build a “Buy Me A Coffee” type feature on my website. This seemed like an excellent way to get paid for the hard work I put into my content.
Building a feature like this from scratch sounds like a nightmare, though. I don’t have time to improve my frontend skills to do this properly; I just want to focus on web3 stuff! So I started looking for an easier solution—and found one with Coinbase Commerce.

The Solution: No-Code With Coinbase Commerce
Coinbase Commerce has easy-to-install payment gateways that make it simple to accept crypto. I can use this to create a “Buy Me A Coffee” feature on my site, no problem!
As a plus, I’m already familiar with Coinbase. I’ve been trading cryptocurrencies since 2017, and Coinbase was the first crypto exchange I ever signed up for.
Installing the donation gateway was easy. All I had to do was create the gateway in my Coinbase Commerce dashboard and then copy the code it generated onto my site. Then with only minor adjustments to the code, I got it to look how I wanted. Now I’m ready to start accepting crypto donations so I can hopefully treat myself to something a little better than frozen pizzas.

How to Install a Crypto Donations Button
For the rest of the article, we’ll run through creating a crypto donations button to show you just how easy it is. We’ll go through it step by step, so even if you’re not a developer, you’ll be able to start accepting crypto in minutes
What You’ll Learn
- How to easily install a link on your website to start accepting crypto donations
What You’ll Need
- A Coinbase Commerce account
- The Google Authenticator App on your phone (for 2-step account verification)
- A website to install your link on
Additional Resources
Step 1 - Set Up a Coinbase Commerce Account
The first step in getting a button to accept crypto donations is to set up a Coinbase Commerce account. Head to https://commerce.coinbase.com/ and select the Get Started button. Follow the steps to get everything set up correctly.
- Choose the Self managed option to get started with just an email address.
- Verify your account through email.
- Set up 2-step verification using the Google Authenticator app on your phone.
- Set up a Coinbase Crypto Wallet.
- IMPORTANT!– Write down your seed phrase somewhere safe! Anyone with this seed phrase can empty your wallet!
- Verify your seed phrase in the next step.
- Lastly, you can save an encrypted version of your wallet to Google Drive if you want, but it’s not necessary.
After completing all the above steps, go to your new dashboard!

Step 2 - Whitelist Your Website
Now that you have a place to send any funds you may receive, the next step is to add your website to the whitelist. This just means adding your website to a list of approved websites that are allowed to host your new payment button. You wouldn’t want just anyone installing it wherever they want!
Click on your email address in the top right corner of the screen and select Settings.
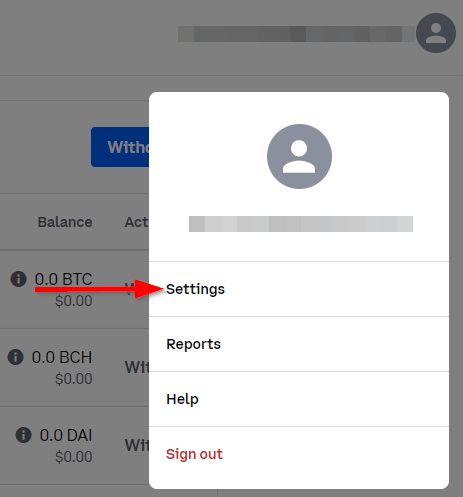
Next, select the Security tab and click on the Whitelist a domain button. Enter the full URL of your website, including the https:// part. If this is successful, you will now see it in the list of approved sites.

Note: If you are a developer testing on a locally hosted instance of your website, you do not need to whitelist localhost.
Step 3 - Create a Checkout
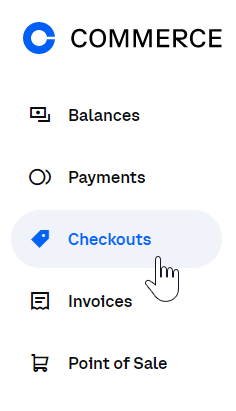
The next step is to create the payment gateway your donate button will send the user to. Click on the Checkouts tab on the left-hand side of the screen, then select Create a checkout.
Fill in the details for your checkout, giving it a name, description, and image if you’d like. Then, select Let your visitors choose under the "What kind of pricing do you want to offer?” heading to accept donations. You can also ask for additional information from the person donating, but this is optional.

Once you have filled in the details, click on the Create checkout button at the bottom to finish. A popup will display some options for you to share your new checkout.
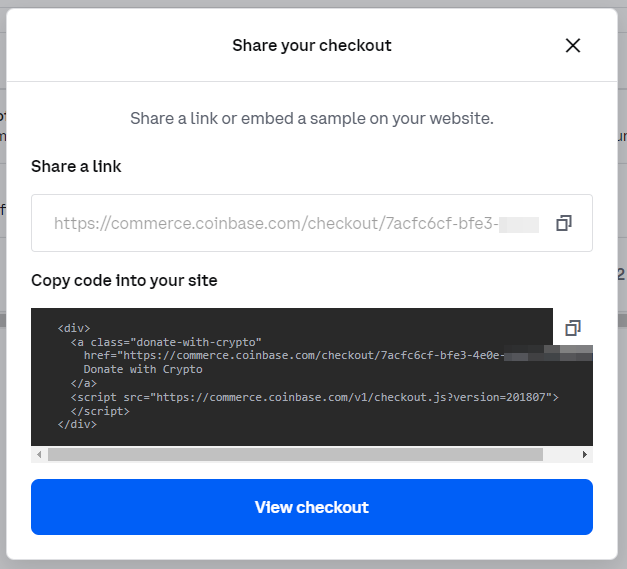
You can share your checkout link directly, copy the code to create the Donation Button on your website, or select View checkout to see it in action.
Step 4 - Add the Code to Your Website
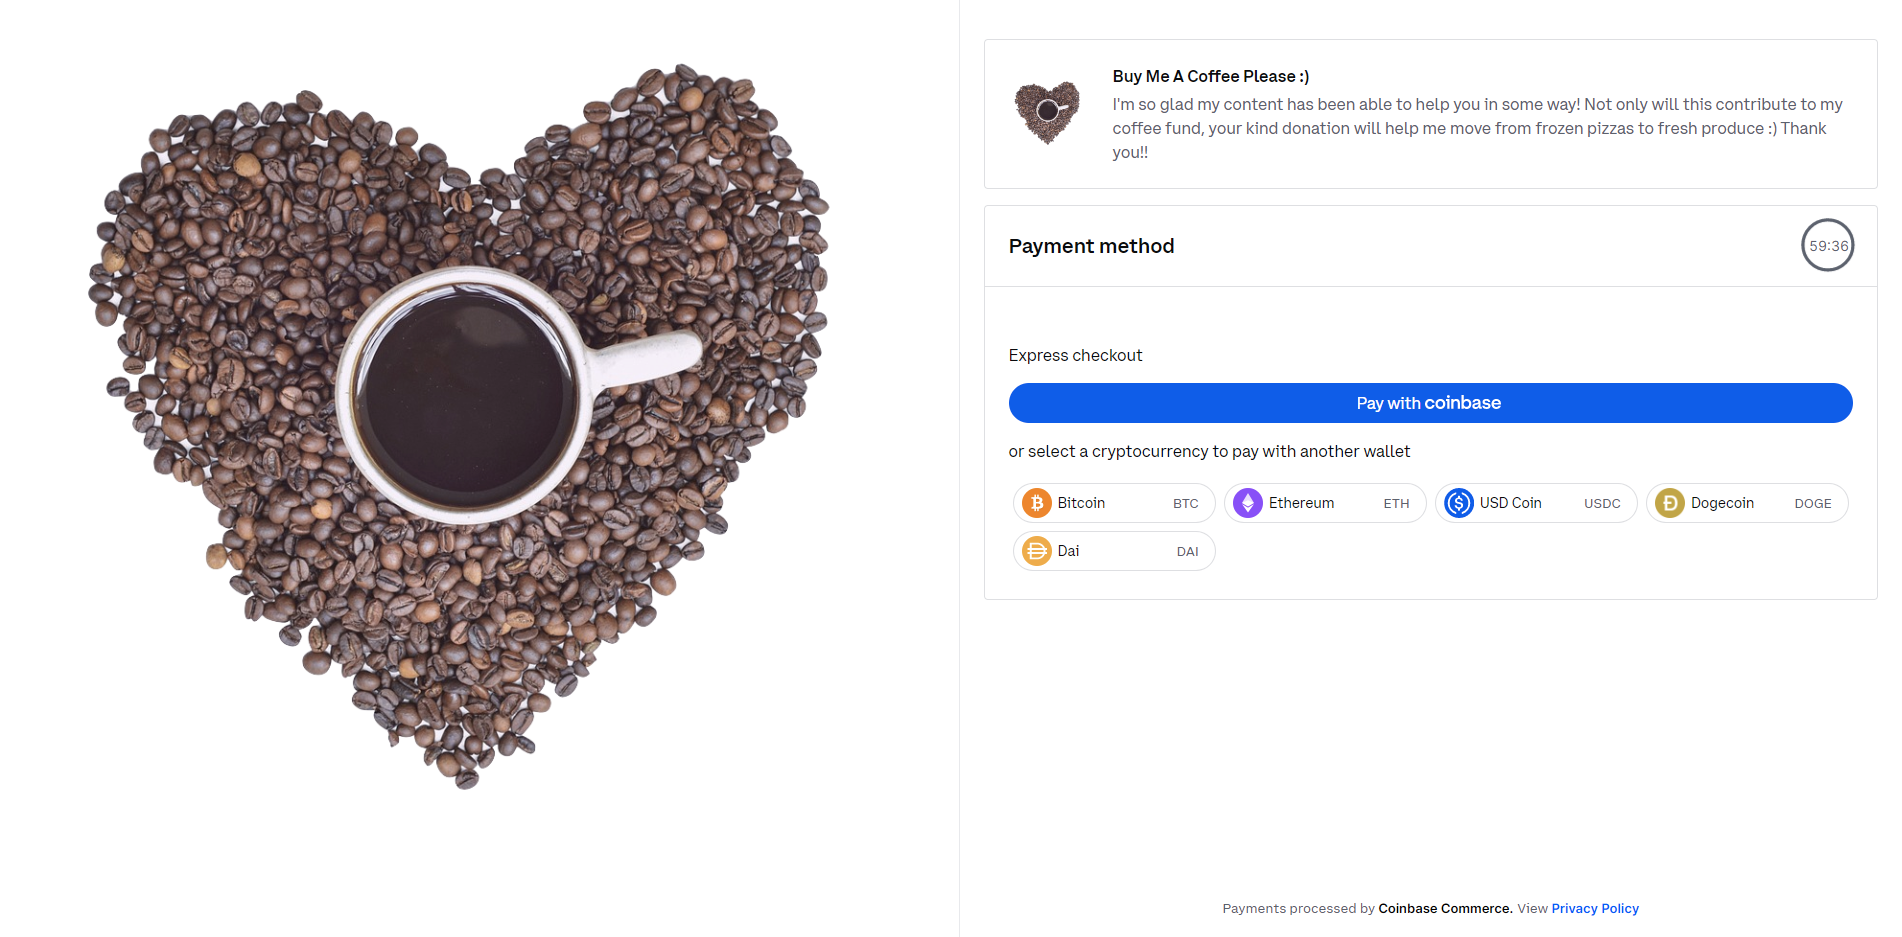
The final step is to place the checkout code on your website. So navigate to your index.html or whichever page you want to put the button on and paste the code where it makes sense for you. For example, I added mine to the bottom of my hero section and changed the Button text to say “Buy Me A Coffee”.

Now clicking on the Donate button will send any charitable users to your shiny, new checkout page where they can donate as much as they like in multiple cryptocurrencies. Here’s what mine looks like:
Conclusion
Creating web3 technical content is challenging, yet rewarding. Any newcomer will see that it is a fast way to learn concepts quickly. However, they will also learn that being a content creator takes a while to start being a profitable career choice. This is where a “Buy Me A Coffee” button helps a lot.
This no-code solution makes things simple for anyone to make a crypto payment gateway in minutes. Now that I’ve got this fancy, new feature on my website, I can start accepting donations for all the hard work I put into creating content! No more frozen dinners for this guy! I’m moving up in the world!
If this article has helped you, maybe Buy Me A Coffee? ;)


