


One of the most promising features of Web3 and the technologies surrounding it is composability. This allows for innovation on top of already existing tech, saving time and making things much more efficient. Open source interoperability is beneficial because a specific problem only needs to be solved once. Other builders can utilize the solution or build upon it at their own discretion in a completely permissionless way.
In this article we will be exploring the concept of composability using interfaces in Solidity smart contracts. Although there are other ways to achieve this, such as inheriting from abstract contracts, interfaces are well suited for simple tasks. We'll interact with the functions of one contract from a completely different contract! If that sounds exciting to you then let's get into it!
What You Will Learn
- How to use an interface to interact with another smart contract
What You Will Need
- An idea of how functions work in Solidity
- Basic familiarity with the online IDE Remix - https://remix.ethereum.org/
Resources
- A great article on Composability by Packy McCormick - https://www.notboring.co/p/idea-legos
Let's Get Started
If you followed along with my last article, you will be able to re-use the smart contract we wrote. We are just going to add a little something for initializing the message variable.
For those of you who didn't read my last article, it's a pretty simple contract. Head over to https://remix.ethereum.org and write the following code into a new file named ChangeState.sol.
// SPDX-License-Identifier: UNLICENSED
pragma solidity ^0.8.7;

contract ChangeState {
    string message;

    constructor() {
        message = "Hello World!";
    }

    function setMessage(string memory newMessage) public {
        message = newMessage;
    }

    function getMessage() public view returns (string memory) {
        return message;
    }
}
What we added to the contract below our declaration of the message state variable and above the declaration of the setMessage function, is called a constructor. It's an optional function that is only executed once when the contract is deployed and is used to initialize contract state. In this case we are initializing our message variable with the value of Hello World!. If there is no constructor defined, a default one will be created behind the scenes upon deployment.
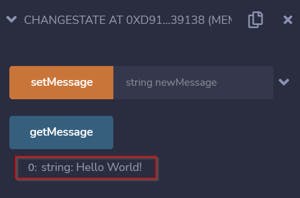
Try deploying the contract and pressing the button for the getMessagefunction. If you aren't sure how to do this, refer to my previous article! You'll notice that before we even do anything, the value of our message variable is already Hello World! Sweet!
Now that we've got a working ChangeState contract, let's make a new contract to interact with it!
Implementing The Interface
We could just create a new contract underneath the ChangeState contract on the same file, but to emphasize that we are actually interacting from a separate contract, let's create a new file.
- Open up the File Explorers tab and create a new file. We'll name this one
Interact.sol. Write the following code in your new contract file:
 // SPDX-License-Identifier: UNLICENSED
 pragma solidity ^0.8.7;

 interface ChangeState {
     function setMessage(string memory newMessage) external;

     function getMessage() external view returns (string memory);
 }

 contract Interact {
     function getMessage(address contractAddress) public view returns (string memory) {
         return ChangeState(contractAddress).getMessage();
     }

     function changeMessage(address contractAddress, string memory newMessage) public {
         ChangeState(contractAddress).setMessage(newMessage);
     }
 }
Before we declare our contract, we are introducing something called an
interface. This is what we will be using to interact with ourChangeState.solcontract and, in this case, what facilitates composability. It is best practice to declare interfaces in between pragma statements and contracts.You'll also notice we have two of the functions from our
ChangeState.solcontract in the interface and that both are declared as external. With an interface, we only need to state the functions we want to interact with. The external access modifier is required to convey that the functions will only be called from outside of the interface. More information on interfaces can be found in the Solidity Docs.Inside our
Interact.solcontract, you'll notice that we pass an address argument into both of the functions. This is the address of the smart contract deployed on the blockchain whos functions we wish to use. So in our case, we would deploy our originalChangeState.solcontract, get the address it was deployed to and then pass that as an argument for the functions in ourInteract.solcontract.Then in the lines with
ChangeState(contractAddress).{name_of_function}()we are using the functions of our other contract.Cool! Now that we understand what it's supposed to do, let's test it out locally in Remix and make sure it works!
Testing Locally
- Let's save our
Interact.solcontract and then deploy it. We should now have two contracts deployed,ChangeState.solandInteract.sol. - First, let's read the value of our
messagevariable in theChangeState.solcontract. Click on thegetMessagebutton in that contract and it should displayHello World!which is what we initialized that variable to. Next let's grab the value of that same variable but this time from our
Interact.solcontract. To do this we will need to get the address that ourChangeState.solcontract was deployed to. Next to the name of the deployed contract, you will see an icon to copy the value to the clipboard. Copy that address and paste it into the text field next to thegetMessagefunction in our Interact contract. Hit the button and it will display the value for us.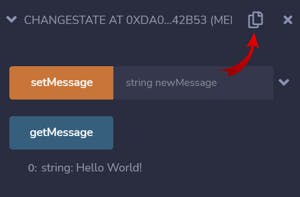
Let's do a quick test again before we move on. Use the setMessage function in our
ChangeState.solcontract to change our message variable to something new. Press the getMessage button from ourInteract.solcontract again and you will see that it displays the new value! So cool!- Now let's test that
changeMessagefunction in ourInteract.solcontract! Paste theChangeState.solcontract address you copied in step 6. into the text field followed by a comma. Then input whatever you want to change themessagevariable to. Don't worry if you forgot to wrap your text in quotation marks. Remix knows that argument is supposed to be a string so adds them automatically on the backend if you didn't. - Now for the moment of truth! Click on the
getMessagebutton for either contract (or both!) and witness the magic. Themessagevariable's value has been changed from a completely different contract! How cool is that?!
Finishing Up
You know what would be even cooler? Deploying these contracts to test network so we can see how it works in an environment that simulates the actual Ethereum Virtual Machine! If that's something that interests you, keep your eyes peeled for my next article or even better, hit that subscribe button!
Thanks for taking the time to read my article. Hopefully you now have a better understanding of how we can implement an interface in one smart contract to use the functions in another. Any questions or comments, feel free to drop them below!