


Introduction
Archive nodes are particular nodes on the Ethereum Network that store historical blockchain data. Because they offer this historical information, they are helpful when you need to audit past transaction history or gather data. Services like Etherscan and Dune Analytics use archive nodes, but anyone can run one themselves.
In this article, we will review the different types of Ethereum nodes, dive deeper into Archive Nodes, and introduce the new archive node capabilities of Infura. We’ll then walk through a real-world project to show how to connect the Infura API and web3.js to a pre-built react frontend. Once complete, the user will be able to query an Archive Node for some statistics for a given Ethereum wallet address.
What Are Ethereum Nodes?
In simple terms, a node is just a connection point in a network. However, in the case of Ethereum, different types of nodes hold various responsibilities to the network.
The Ethereum blockchain operates on what is called the Ethereum Virtual Machine (EVM), which is a type of decentralized global computer. Nodes, in this case, provide the processing power for this computer. They serve requested data, create and validate blocks, store transaction data or smart contract code, and much more. Anyone with the required hardware can download an Ethereum client and spin up their own node to participate in the network. This also prevents any single entity from controlling the entire network and contributes to Ethereum’s decentralization.
There are four main types of Ethereum nodes, each contributing to the network differently. Together they relay information to other nodes, verify transactions and the EVM state, and provide the infrastructure needed to keep the Ethereum Network operating efficiently. They communicate with one another to ensure they all agree on the state of the network. Therefore, having more nodes makes the network stronger and more resilient to attacks.
Types of Ethereum Nodes
Full Node
Full Nodes verify transactions and EVM state, validate blocks, launch and execute smart contract code, and can serve network data when requested. They also store the state of the Ethereum Blockchain up to the most recent 128 blocks but can build an archive of historical states on demand.
Mining Node (Commonly referred to as a “Miner”)
A Miner is a Full Node running a mining client. In its present state, Ethereum provides consensus through the proof-of-work algorithm. To summarize, this means a mining node competes in a computation race with other mining nodes to create the next block. Once created, the new block is broadcast to the network to be verified by other nodes and appended to the end of the blockchain.
Light Node
A Light Node is a “light” version of a Full Node, which only contains block header data such as the previous block’s hash and a timestamp rather than the block data in its entirety. They make on-demand requests to Full Nodes and only validate certain pieces of state as required by their users. Example uses are to check balances, verify if a transaction was confirmed, check event logs, and do other light-duty tasks. Light Nodes can be easily run by lower-capacity devices such as a mobile phone or RaspberryPi.
Archive Node
An Archive Node is a type of Full Node that is running in “archive mode”. They contain all the same data as a Full Node but also all the historical state data of the entire blockchain since Genesis Block. We’ll focus on archive nodes for the remainder of this article.
More on Archive Nodes
Although Full Nodes can rebuild historical blockchain state data, this process is slow and inefficient. Depending on the use case, this data may need to be served up quickly. This is where Archive Nodes come in. Because Archive Nodes contain historical data from the very first block, they can easily trace any arbitrary transaction at any time.
Why Access an Archive Node?
If there is information you need to get from the Ethereum Blockchain before the most recent 128 blocks, the most efficient way to get this is through an Archive Node. Some of this information may include account balances, smart contract code, transaction counts, or the value at a particular storage position. They also enable the testing of smart contract code without creating a transaction on the blockchain.
Specs to Run an Archive Node
Running your own node means having more control of the information you share with the blockchain. You can create more secure and private dApps (decentralized apps), and your addresses and balances won’t leak to random nodes on the network. Running an Archive Node also means quick access to historical blockchain data without signing up for any third-party services.
These are the specifications you would need to be able to run your own Ethereum Archive Node:
- A CPU with at least four cores
- 16 GB or more of RAM
- An SSD drive with at least 6 TB of space
- At least 25 MBit/s bandwidth
As you can see, the requirements to spin up an Archive Node make it reasonably accessible. Not exactly cheap, but still within reach to an individual. It does require some technical know-how and constant upkeep though. If you don’t have the time, drive, or equipment to run your own, a Node Provider is a great alternative.
Archive Node Providers
Node Providers make it simple for anyone to access and interact with the Ethereum Blockchain through their easy-to-use APIs. All you need to do is create a new project and then easily call JSON RPC methods with the URL they provide.
Infura
Infura is arguably the most popular Node Provider in the space. It was created by ConsenSys, the team behind MetaMask and the Truffle blockchain development framework. They’ve been around for a while, and their services are great for beginners and organizations looking to scale.
- Now has free Archive Node Access
- Great free pricing tier
- Offers access to Layer 2 scaling solutions
- Many other add-ons to fit your needs
- Excellent documentation
Use Cases
Depending on the type of project you are building, there are several different technologies you could connect to a Node Provider.
Truffle / Hardhat
If you are writing smart contracts that interact with historical data, then a development suite such as Truffle or Hardhat would fit your needs. They both have an assortment of built-in tools that make the entire development lifecycle for your dApp much easier. Connecting to an Archive Node, in this case, is as easy as setting your provided API URL endpoint as a variable to be used in your frontend code.
Ganache
If you need quick access to an Archive Node for local development or testing, Truffle offers a personal blockchain that accomplishes this nicely. This blockchain is called Ganache. As of Ganache version 7.0, spinning up a local instance of the Ethereum blockchain with Archive access is as simple as one command:
ganache --fork
You could then interact with it similarly as above, using the URL: http://localhost:8545, or whatever you set the port to.
Direct Integration
If you don’t require a suite of blockchain tools, then you can use your Node Provider URL directly in your frontend code and connect to it with a JavaScript library such as ethers.js or web3.js. This is the option we will explore in the project below.
The Project
As mentioned at the start of this article, we will be making a simple “Year in Review” type app to display some wallet statistics from 2021. We will clone a pre-built frontend, so all we have to worry about is querying an archive node and then displaying the data nicely.
What we will learn:
- How to get an Infura API URL with archive access
- How to gather archive data using an Infura API URL and web3.js
- The JavaScript required to collect the data from the blockchain
- How to put the data together to display it nicely in the app
What is needed to complete the project:
Additional resources
The Infura API URL
The first step in our project is to set up our Infura account and acquire our API Endpoint URL. Head to infura.io and either create a new account or log in.
Create a new project to get the API Endpoint URL we will need later in our project.
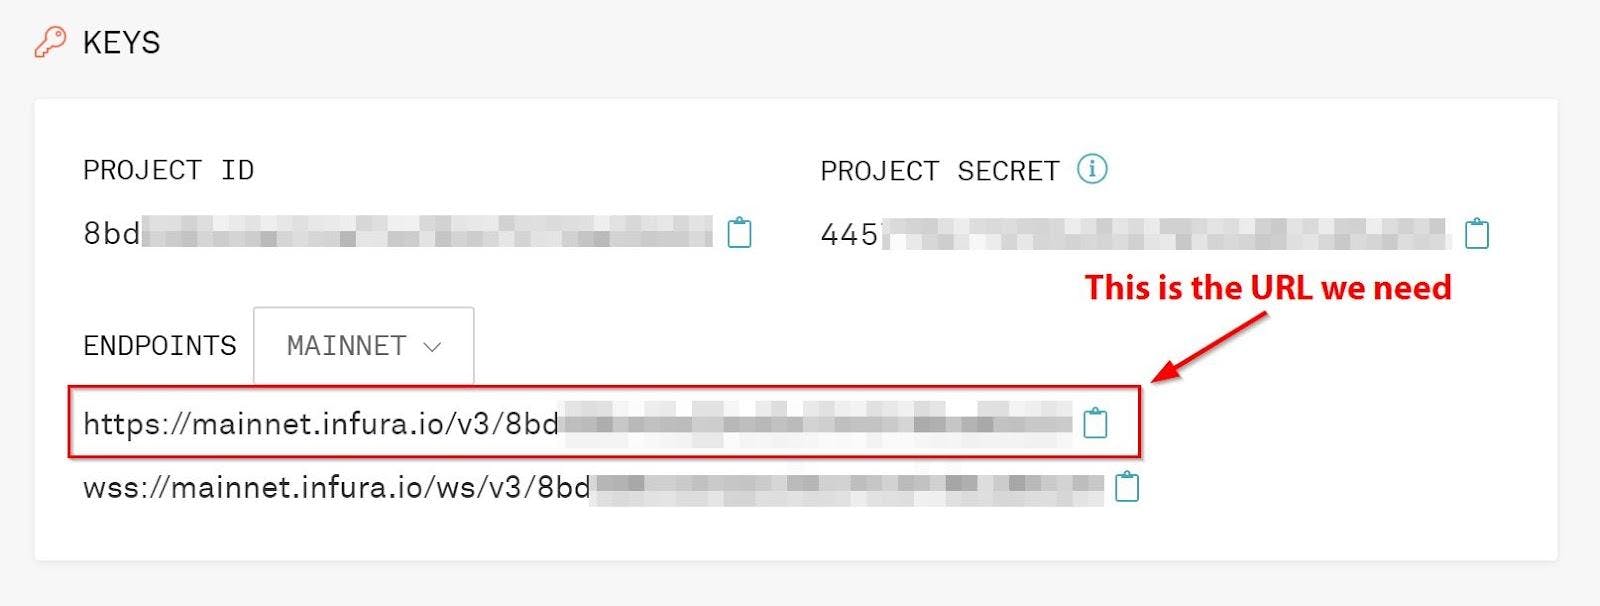
Since archive access is now free for all users, we don’t need to complete any other steps with our Infura account.
With that out of the way, let’s start working on the frontend!
The Frontend
We will be building on top of a pre-made React frontend for the rest of this project. If you’ve never used React before, that’s okay. We will be walking through the rest of the steps together.
To install the project properly, we will use git and node package manager (npm). To see if they are already installed, we can check the version numbers in the command line:
npm --version
git --version
If they still need to be installed on your machine, you can get them at the following links:
- Node / npm: https://nodejs.org/en/
- Git: https://git-scm.com/downloads
Once installed, we are ready to start working on the rest of the project:
In the command line, navigate to the folder you would like to work out of and clone the repository for our project:
git clone https://github.com/paul-mcaviney/archive-node-project-frontend.gitChange directories into the new project folder and install the required dependencies: cd archive-node-project-frontend
npm iAfter the dependencies finish installing, let’s run the project to make sure it’s working correctly so far:
npm startIf everything is installed correctly, we will now have a frontend running on
http://localhost:3000that looks like this: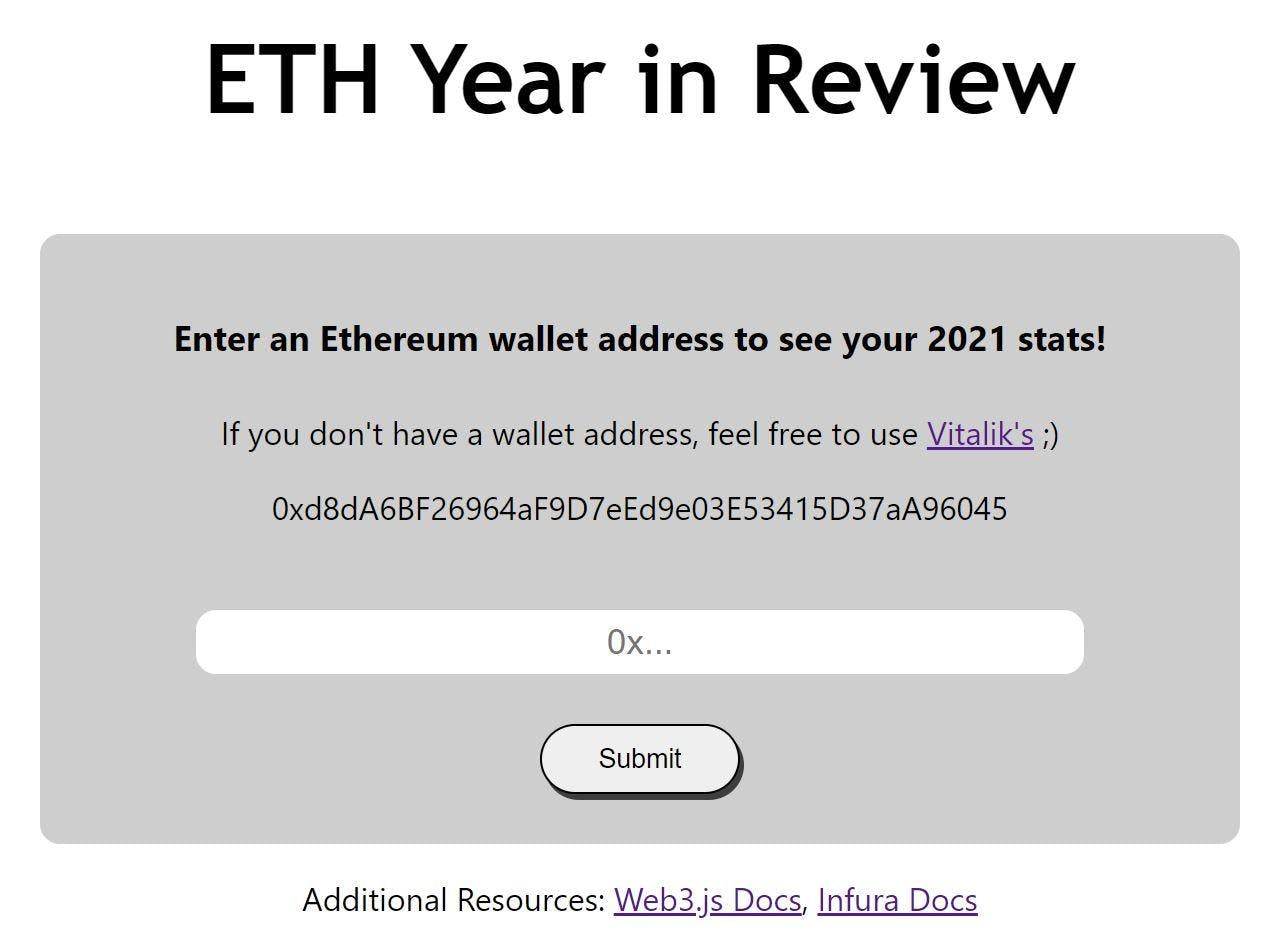
There’s a text field we will use to enter a wallet address. Clicking the Submit button takes us to our results page. We can also return to the input page from here by pressing the Enter New Address button.
Before we start coding, we need to install one more dependency. We will be using web3.js to access an Archive Node with our Infura URL. To install web3.js, type the following command in the directory for our project:
npm install web3We will do all of our coding in the
App.jsfile under thesrcfolder. The first bit of code we need to write is to import web3 to our project and connect it to our Infura URL. Under the import statements, and before the App function, add the following code:const Web3 = require('web3'); const infuraURL = 'YOUR_INFURA_URL_HERE'; const web3 = new Web3(new Web3.providers.HttpProvider(infuraURL));Note: Do not upload this project to a public repository without first hiding your actual Infura URL. You can use environment variables for this.
We’ll be using the
useStateReact hook to update our UI. You’ll notice it’s already imported at the top of our file. Next, let’s add some React state variables to make it easier to display the data we gather from our Archive Node. Under the results state variable, add the following:const [address, setAddress] = useState(''); const [currentBalance, setCurrentBalance] = useState(0); const [startOfYearBalance, setStartOfYearBalance] = useState(0); const [endOfYearBalance, setEndOfYearBalance] = useState(0); const [balanceDifference, setBalanceDifference] = useState(0); const [transactionCount, setTransactionCount] = useState(0);Now we need to update the
handleInputfunction to assign the user input to our address state variable instead of logging the comment:const handleInput = event => { setAddress(event.target.value); };Note: You’ll notice we didn’t put any checks here to make sure what the user inputs is actually an Ethereum wallet address. This is for the sake of keeping this tutorial simple. You will want to handle this differently if deploying publicly.
The last bit of JavaScript is an asynchronous function that will gather the data from the Archive Node, convert it to more readable values, and set our state variables. Under the comment that says Your JavaScript code will go here, type the following code:
// Access and process data from Ethereum blockchain
const accessEthereum = async () => {

  // 2021 Start and End Block variables
  const START_2021_BLOCK = 11565019;
  const END_2021_BLOCK = 13916165;

  // Get current balance of address
  const balance = await web3.eth.getBalance(address);

  // Convert balance from wei to ETH and set state variable
  setCurrentBalance(await web3.utils.fromWei(balance.toString(), 'ether'));

  // Get wallet balance at the start of 2021 (Block #11565019)
  const startBalance = await web3.eth.getBalance(address, START_2021_BLOCK);

  // Get wallet balance at the end of 2021 (Block #13916165)
  const endBalance = await web3.eth.getBalance(address, END_2021_BLOCK);

  // Convert startBalance to ETH and set state variable
  const startBalanceAsETH = await web3.utils.fromWei(startBalance.toString(), 'ether');
  setStartOfYearBalance(startBalanceAsETH);

  // Convert endBalance to ETH and set state variable
  const endBalanceAsETH = await web3.utils.fromWei(endBalance.toString(), 'ether');
  setEndOfYearBalance(endBalanceAsETH);

  // Set balanceDifference from start to end of 2021
  setBalanceDifference(endBalanceAsETH - startBalanceAsETH);

  // Get transaction count at start of 2021 (Block #11565019)
  let startTransactions = await web3.eth.getTransactionCount(address, START_2021_BLOCK);

  // Get transaction count at end of 2021 (Block #13916165)
  let endTransactions = await web3.eth.getTransactionCount(address, END_2021_BLOCK);

  // Set total transaction count in 2021
  setTransactionCount(endTransactions - startTransactions);

  // Received results, condition met to show them on screen
  setResults(true);

};
Moving on to the HTML, the first thing we need to do is replace the button function with the new one we just wrote. Change the function call for the button under the Change this button function comment:
<button onClick={accessEthereum} className='form-button' type='submit' name='submit' id='submit'>The final bit of code we need is the HTML that will display the data we gathered from our Archive Node. In the return statement, scroll down to the comment that says Your HTML code will go here and add the following:
<h3>{address}</h3>

<p className='result-heading'>Current Balance</p>
<p>{currentBalance} ETH</p>

<p className='result-heading'>Start of 2021 Balance</p>
<p>{startOfYearBalance} ETH</p>

<p className='result-heading'>End of 2021 Balance</p>
<p>{endOfYearBalance} ETH</p>

<p className='result-heading'>Difference from Start of 2021</p>
<p>{balanceDifference} ETH</p>

<p className='result-heading'>Number of transactions in 2021</p>
<p>{transactionCount}</p>
<br />
To see the complete project code, check out this Github repository.
Now let’s test out our app and see if it works! First, start the app:
npm startEnter an Ethereum wallet address to the text field and hit Submit. If you don’t have a wallet address that was active in 2021, you can use Vitalik’s.
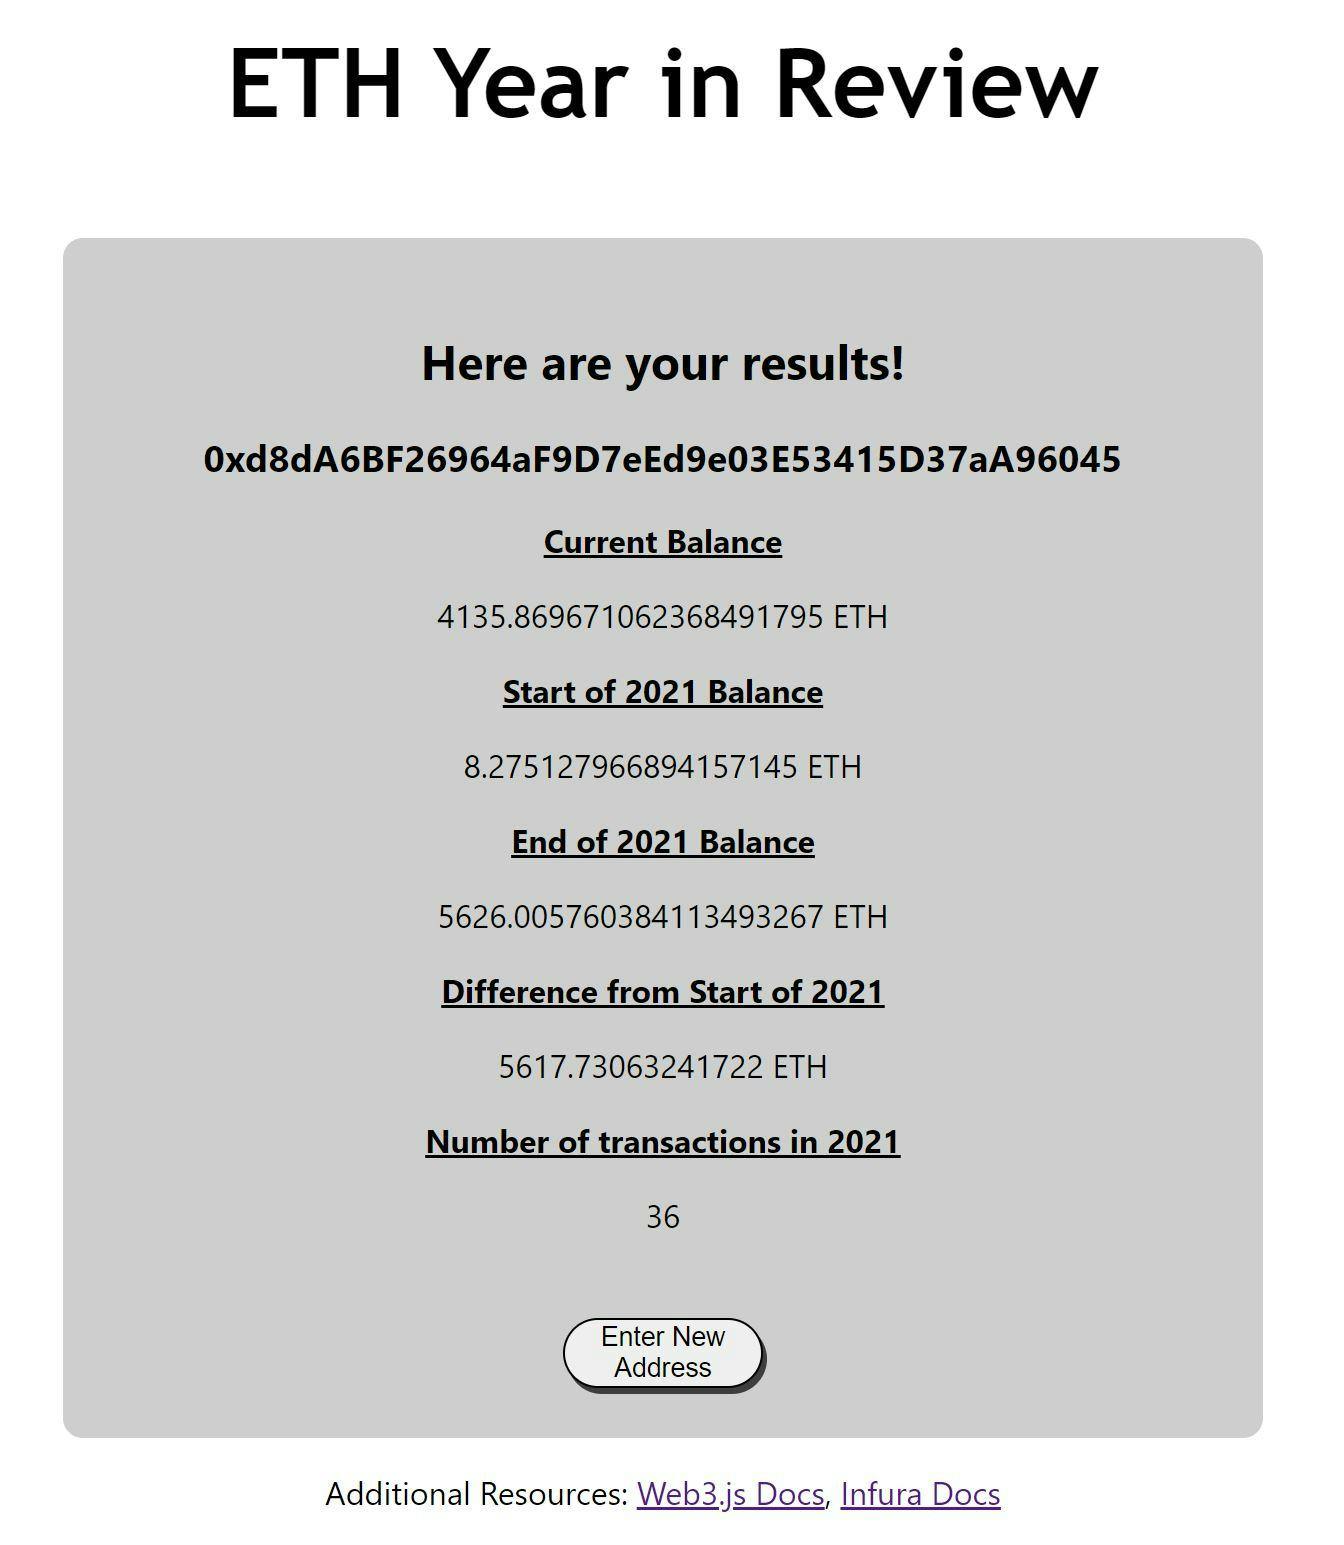
Awesome! Our results are displayed correctly, and we can see all the activity of the wallet address in 2021!
Conclusion
By following this tutorial, you accessed the data on an Archive Node using your Infura API Endpoint URL, then displayed it nicely in a simple ETH Year in Review app.
An Archive Node is required to access data from the Ethereum Blockchain prior to the most recent 128 blocks. They store all historical state data from the very first block and serve it up much more quickly and efficiently than a Full Node. Now that Infura offers free Archive Node access to all users, gathering historical blockchain data has never been easier!